
Here are a few Helpful Hints that may help you out with your Cobham EXP710 BGAN unit.
Getting Started
Here are a few Getting Started Tips to help you out with your Cobham EXP710 BGAN unit.
Opening Transport Latch
The EXPLORER 710 has a transport latch, securing the transceiver and antenna during transport. Before using the unit, this must be undone.
- Lift the transport latch to open the terminal.*
- Flip up the antenna module. You can now access the keypad and connectors on the EXPLORER 710.
* Due to tight tolerances in manufacturing the latch may be extremely tight when first purchased and may require the use of a tool to help.
Inserting the SIM Card
The SIM card is provided by your Airtime Provider. Follow the directions below to insert the SIM Card:
- Locate the SIM slot on the same side where the battery is inserted.
- Insert the SIM card into the SIM slot with the chip side facing up.
- Press gently until it clicks.
- Slide the lock in front of the SIM slot.
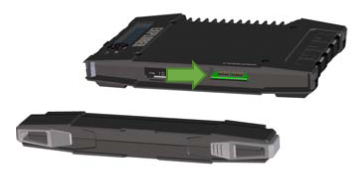
Inserting the Battery
To insert the Battery please see the instructions and images below:
- Insert the battery so that the connector fits into the battery slot, indicated in the figure.
- Press gently until it locks.
Powering EXP710 On and Off
- Slide and hold the power button until the Status indicator lights up and start flashing Green. This may take some seconds.
- When the Status indicator flashes slowly or is constant green, and the display shows Ready, the terminal is ready for use.
- To switch off, hold the power button until the Status indicator flashes yellow. This may take some seconds.
Pointing the Antenna
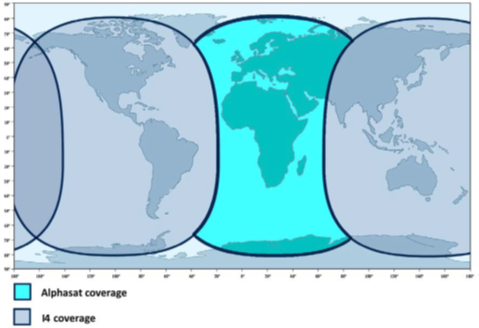
Before Pointing
Before pointing the antenna you can use the coverage map below to find your approximate location in relation to the satellites. Then you can use the compass to find the pointing direction to the closest satellite.
The 3 Inmarsat satellites are positioned above the equator, at the center of each “footprint"
To obtain optimum bandwidth and operating time, adjust the position of the antenna with great precision.
Do as follows:
- If the terminal is not already in pointing mode, select (gear icon) in the display and select Point now.
- Use the compass to locate the approximate direction from the antenna front face to the satellite.
- Slowly rotate and tilt the EXPLORER 710 antenna to find the highest possible signal strength. Use the display and the pointing sound to guide you. Remember that the more accurately the terminal is aligned, the better throughput and lower power consumption you will get!
- Press OK on the display keypad when you have obtained the highest possible signal strength.

Audio assisted pointing
You can set up whether or not you want a sound to indicate the signal level during pointing (Audio assisted pointing), to help you find the maximum obtainable signal strength. The sound pattern is as follows:
- Poor signal strength: • • • •
- Good signal strength: •••••••••••••••••••
- Optimum signal strength: (continuous sound instead of single “beeps”)
To enable or disable the pointing sound:
- Select (gear icon) in the display.
- Select Settings > Audio indication > pointing.
- Select On or Off.
The registration procedure (BGAN)
The display shows the progress as follows:
- Searching:
The EXPLORER 710 searches for the network operator. Note that the search procedure can be very short, so you may not see this text.
- Registering:
The EXPLORER 710 is registering itself on the network. If the GNSS position has not yet been acquired at this point, the display may show No position.
- Ready (or other status information):
Ready means the EXPLORER 710 is registered on the network and is ready to go online. If there is any other status information to show, e.g. if a call or data session is active or there is a warning, the display will show that instead?
Note: By default, if you want to use a data connection, you must manually start it from the display or from the web interface.
To Re-Point the antenna
You may need to point the antenna again later, e.g. if the terminal has been moved or the signal is blocked. To start the pointing process again, do as follows:
- Display:
Select (Gear icon) and select Point now. Then go through the pointing process as described in the previous section, and press OK in the keypad when the signal strength is OK. - Web Interface:
Select(Gear icon) (Control panel) > Point now. Then go through the pointing process as described in the previous section and click Accept in the web interface or OK in the display.
Pointing in EXPLORER Connect app
To start the pointing procedure from the EXPLORER Connect app, do as follows:
- Select Pointing from the EXPLORER Connect app.
- If the pointing process is not already started, tap Start. The signal strength is shown on the screen.
- Turn and tilt the antenna slowly as described in the previous sections until you have obtained the highest possible signal strength.
- Tap Accept. The terminal will now try to register on the BGAN network
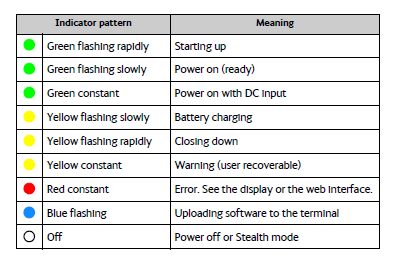
LED Status
Connect WLAN Interface
To connect to the WLAN interface, do as follows:
- Check that WLAN is enabled in your EXPLORER 710. The top line of the display shows which interfaces are enabled.
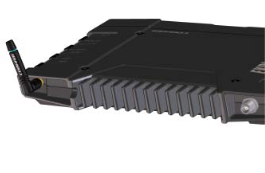
- If your device is not close to the EXPLORER 710, turn the WLAN antenna of the transceiver into an upright position.
- Place your WLAN-enabled device (computer, tablet or smartphone) close to the EXPLORER 710, but not in front of the antenna.
- On your device, search for available WLAN networks.
- Select the EXPLORER 710 WLAN access point when it appears in your list of available wireless networks. The default name is EXPLORER710.
- You may have to enter a password.
By default, the password is the serial number of your EXPLORER 710 and the encoding type is WPA2. You can find the serial number in the display menu under Properties > Hardware > Unit serial number.
Please make sure that the WLAN is Exposed, as shown in the image below:
Connect to the LAN interface
To connect to the LAN interface, do as follows:
- Connect the LAN cable to the network interface of your computer. A suitable cable is provided with your EXPLORER 710.
- Connect the other end of the cable to one of the LAN connectors on the EXPLORER 710.*
* Important: The ISDN interface and the LAN interface use the same connector type. Be careful not to connect to the wrong interface.
Your computer should now be connected to the EXPLORER 710. If you want to connect to the Internet, you must start a data connection.
Connecting Your Smartphone to the EXP710
To use your phone to make calls through the EXP710 using WLAN, do as follows:
- Start up the EXP710 terminal.
- Connect your smartphone to the wireless access point of the EXPLORER 710.*
- Start the EXPLORER Connect app and select Satellite Phone (or start another SIP application). If it is the first time you use the EXPLORER Connect app, you must select Register when prompted. **
* If you are having problems staying connected or registering via the EXPLORER Connect App place your device in Airplane Mode. Once you have done this, reactivate Wi-Fi and reconnect to the EXP710 to continue.
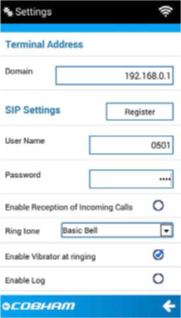
** If you are not prompted to Register please click the icon with two gears on the bottom right of the EXPLORER Connect App Home screen and Tap Register (as seen on the image below.)
NOTE:
If you are using the EXPLORER Connect app for the first time, make sure that “Enable Reception of Incoming Calls” is selected in the settings page. This is to prevent your smartphone from closing the WLAN connection when not in use. This is necessary in order to be able to receive calls on your smartphone.
Comments
0 comments
Please sign in to leave a comment.